
*The NEM team would like to thank Anthony (Telegram user @antownee) for creating this app and blog.*
NEM Hot/Cold Wallet
===================
# Index
Part 1: Introduction
Part 2: Build the first ever Hot/Cold Wallet
Part 3: Tuturial on using the Hot/Cold Wallet
# Part 1: Introduction
In this blog, we introduce a new and revolutionary idea in cryptocurrencies and blockchain technology. We will set up a cold wallet, i.e., a wallet that has never touched the internet, that is also a hot wallet, i.e., a wallet that can easily send and receive assets. This means a user has the security of an offline cold storage but that they can actually send and receive XEM. This is thanks to NEM's powerful APIs and tiered architecture designed from the ground up with 100% new code.
The advent of cryptocurrencies has seen an increase of interest and investments into this new space and with this comes the need to focus on security. Fortunately, in an ideal situation, blockchain technology is built with this in mind, provided you are in control of your private keys.
NEM is consistently ranked in the top 10 via market capitalization and provides an easy and intuitive way to interact with its blockchain to further help developers and users alike bolster their security. To achieve this, we shall essentially implement "air-gapping" a wallet; meaning this wallet will never touch the internet nor directly connect to another device that is connected the internet (e.g., hardware wallets), yet still be able to send and receive cryptocurrency.
So what can you do to ensure more safety? Well, if you have two computers, you can always keep your private keys separated from the internet, protecting them completely against cyber attacks. All you have to do is, create your transaction online, sign it offline to protect your keys, and broadcast it online again. This is what is known as “air gap” protection or "cold storage."
----------
### "Air-gapping"
The idea behind air-gapping is to have two separate devices. One that can access the internet and the other that will NEVER connect to the internet. The emphasis on the NEVER is quite clear as this is the device that will hold your private keys; in this case, we will use an Android phone that is no longer being regularly used. What we are essentially doing is splitting the transaction creation and signing from the broadcasting of it. The creation and signing will be done on the offline device while the broadcasting will be done on the online device. This has in theory been possible before in the past by technically savvy devs, but for the first time, we are now offering an experimental app that almost anybody can use and without having to buy additional hardware. It should be noted that this is an experimental Proof-of-Concept app and should be treated as so and used with caution. The NEM team is not responsible for the loss of any funds that occur as a result of using this app.
# Part 2:
## Development process
### Create-sign app (Cold)
Both apps were built using an Ionic framework to enable cross-platform compliance. As well, the nem-SDK was used extensively for this app which is available on npm via npm install nem-SDK
For the creation-signing app, I had to achieve the following:
> - Scan mobile account QR
> - Decode QR and wallet to retrieve private key
> - Use obtained private key to create and sign transaction
> - Generate QR
I won't go into detail about the entire process but here's the GitHub link to the full code.
However, I'd like to talk about the bit that proved challenging as it wasn't properly documented: **Decoding QR and decrypting wallet**.
Decrypting the QR code was fairly straight forward and it yielded a similar json object:
```
// Foo
let walletinfo = {
"V" 1,
"type" 3,
"date": {
"name": "test-WLT"
"priv_key":"23a57b49fbac363aa2a9d8d5421930b14c3c55fa96a4c675611766207fdf67a61ded08686f72d874db7cb057354dcae7115cf69c1fe33c57af4a891f346a7e07",
"salt":"580e102a1b834b2ded7dcb26f683af4097e57a6803b01cbc343216a4d52dd7e0"
}
}
```
The following function was used to decrypt the wallet with the above object
```
// Decrypting wallet
decryptWalllet(walletinfo, password) {
return new Promise((resolve, reject) => {
let salt = CryptoJS.enc.Hex.parse(walletinfo.salt);
let encrypted = walletinfo.priv_key;
let key = CryptoJS.PBKDF2(password, salt, {
keySize: 256 / 32,
iterations: 2000
}).toString();
let iv = encrypted.substring(0, 32);
let encryptedPrvKey = encrypted.substring(32, 128);
let obj = {
ciphertext: CryptoJS.enc.Hex.parse(encryptedPrvKey),
iv: convert.hex2ua(iv),
key: convert.hex2ua(key.toString())
}
resolve(CryptoHelpers.decrypt(obj));
})
}
```
The result of this function is the wallet's private key with which it will create and sign the transaction.
```
// Sign Transaction
signTransaction() {
// Set the private key in common object
this.common.privateKey = this.nemPrivatekey;
// Check private key for errors
if (this.common.privateKey.length !== 64 && this.common.privateKey.length !== 66)
return {
error: true,
message: 'Invalid private key, length must be 64 or 66 characters !'
};
if (!nem.utils.helpers.isHexadecimal(this.common.privateKey))
return {
error: true,
message: 'Private key must be hexadecimal only !'
}
// Set the cleaned amount into transfer transaction object
this.transferTransaction.amount = nem.utils.helpers.cleanTextAmount(this.nemAmount);
// Recipient address must be clean (no hypens: "-")
this.transferTransaction.recipient = nem.model.address.clean(this.nemAddress);
// Set message
this.transferTransaction.message = this.nemMessage;
// Prepare the updated transfer transaction object
var transactionEntity = nem.model.transactions.prepare("transferTransaction")(this.common, this.transferTransaction, nem.model.network.data.mainnet.id);
// Create a key pair object from private key
var kp = nem.crypto.keyPair.create(this.common.privateKey);
// Serialize the transaction
var serialized = nem.utils.serialization.serializeTransaction(transactionEntity);
// Sign the serialized transaction with keypair object
var signature = kp.sign(serialized);
// Build the object to send
var result = {
'data': nem.utils.convert.ua2hex(serialized),
'signature': signature.toString()
};
// Show the object to send in view
return {
error: false,
message: JSON.stringify(result)
}
}
```
Thereafter, a QR code will be generated which will then be scanned by the broadcast app.
Here’s the [code](https://github.com/Antownee/nem-transaction-signer-ionic) in its entirety for your perusal.
### Broadcast app
The broadcast bit was fairly straightforward. All it had to do was scan the generated QR code by the cold wallet and broadcast it into the blockchain by making a POST request to the given endpoint.
Note: This end-point was selected from a list of available NEM mainnet nodes that are accessible [here](http://chain.nem.ninja/#/nodes/).
```
this.nodeUrl = "http://62.75.251.134:7890/transaction/announce";
//Broadcast transaction
broadcastTx(signedTransaction: any): Promise {
this.signedTx = signedTransaction;
let headers = new Headers({ 'Content-Type': 'application/json' });
let options = new RequestOptions({ headers: headers });
return this.http.post(this.nodeUrl, this.signedTx, options)
.toPromise()
.then(this.extractData)
.catch(this.handleErrorPromise);
}
```
[Here](https://github.com/Antownee/nem-transaction-broadcaster-ionic) is the entire code repo up on GitHub.
# Part 3: Tuturial on using the Hot/Cold Wallet
## Overview
An extra layer of security while moving your funds is added by the use of [paper wallets](https://forum.nem.io/t/voucher-paper-wallet-generator/2998). In achieving so, you will have achieved an almost completely cold wallet environment. As previously explained, you will need two smartphones where one will never connect to the internet while the other does. Alternatively, a wallet could also be created via an offline iOS/Android/NanoWallet app and backed up before moving the wallet to the transaction signer app.
We suggest using an unrooted Android phone with freshly installed OS on it. Then to install the transaction signer app, and then turn the phone into airplane mode for the life of the device. Note: connecting the app to the internet after turning on airplane node negates the security provided by having an offline signer application.
Install the apps as follows:
- `Transaction Broadcast app`: Install it on the phone that will connect to the internet.
- `Transaction Sign app`: This will be installed on a smartphone that will not connect to the internet
## Advance preparation
In this step, we will create a paper wallet, preferably on a PC that is not connected to the internet. This further bolsters our cold environment approach to moving our funds to and from our wallets. Download the [paper wallet](https://forum.nem.io/t/voucher-paper-wallet-generator/2998) generator app and follow the below information:
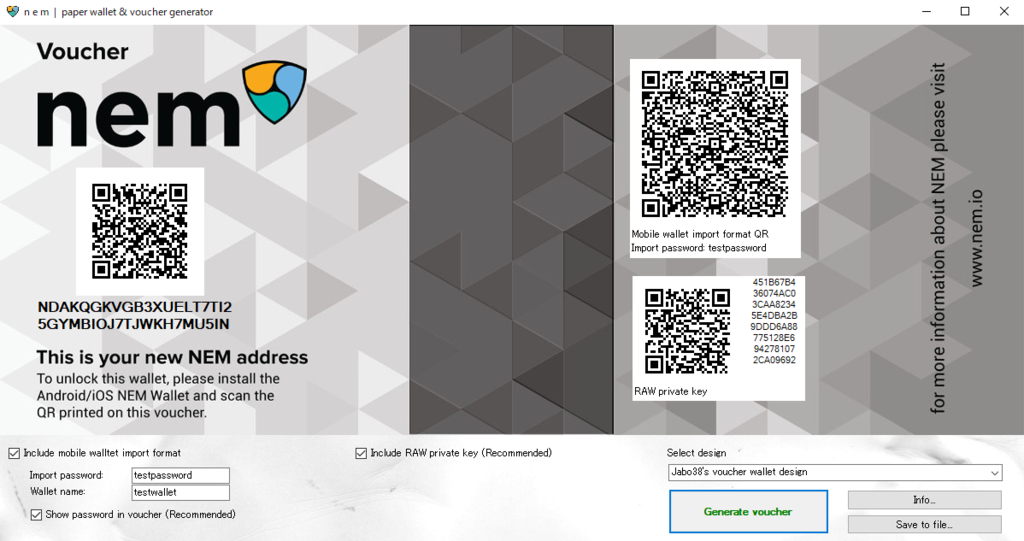
##### Description
- The QR code on the left has account address information of NEM that can be openly shared with anyone. Funds will be credited by remitting to this address.
- The QR code in the upper right has information on the private key encrypted with the password. Both the NanoWallet and smartphone apps have the same structure as QR which contains the private key.
- The lower right QR code is the private key itself. A general QR code reader can read the secret key string itself.
## How to withdraw funds from Cold wallet
### `NEM Hot/Cold wallet`
Launch this app on your old smartphone or on the phone that will not connect to the internet. This is the app that signs your transaction offline.

##### Description
- `SCAN WALLET QR`: We are able to obtain your private key by scanning the QR code in the upper right corner of the paper wallet.
- `MANUAL ENTRY`: Enter the destination address/remittance amount/message/private key manually. However, it is also possible to scan a prepared invoice QR code. Invoices can easily be made in the NanoWallet or Android/iOS NEM apps available at nem.io.
#### SCAN WALLET QR

Enter the password in the popup to decrypt and obtain the private key.
After inputting it, the QR reader will start up, scan the QR code and eventually fill in the private key field of the provided wallet.

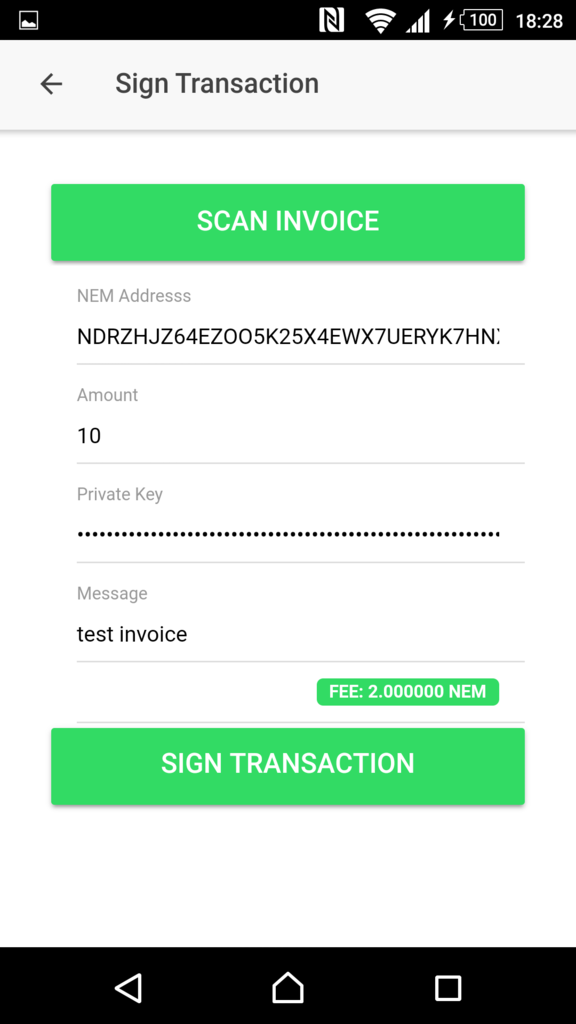
On this screen, the private key is automatically filled on successful decryption. If you have a prepared invoice QR, you can hit 'SCAN INVOICE' which as before, with prompt the camera to scan your invoice QR code. Therefater, your 'NEM address,' 'Amount' and 'Message' fields will be automatically filled.
Upon filling of all required fields, the 'SIGN TRANSACTION' button is then enabled.
Once the 'SIGN TRANSACTION' button is pressed, a new page appears containing the eventual QR code that should be broadcast to the network.
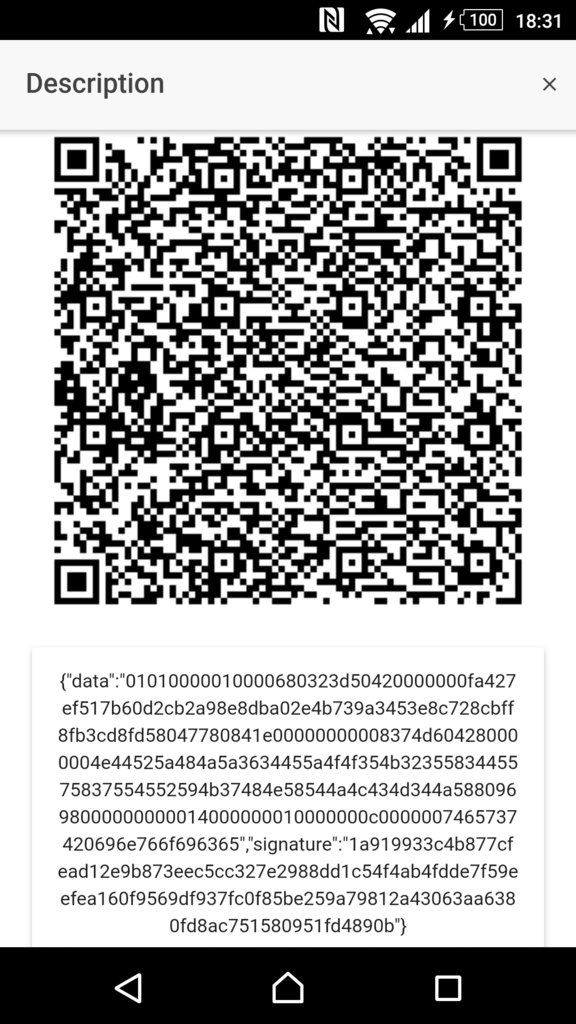
This QR code will be scanned by the 'Transaction Broadcast' app.
### `Transaction Broadcast app`
Launch this app that you have installed on your regularly used smartphone. e.g., the one that is connected to the internet.
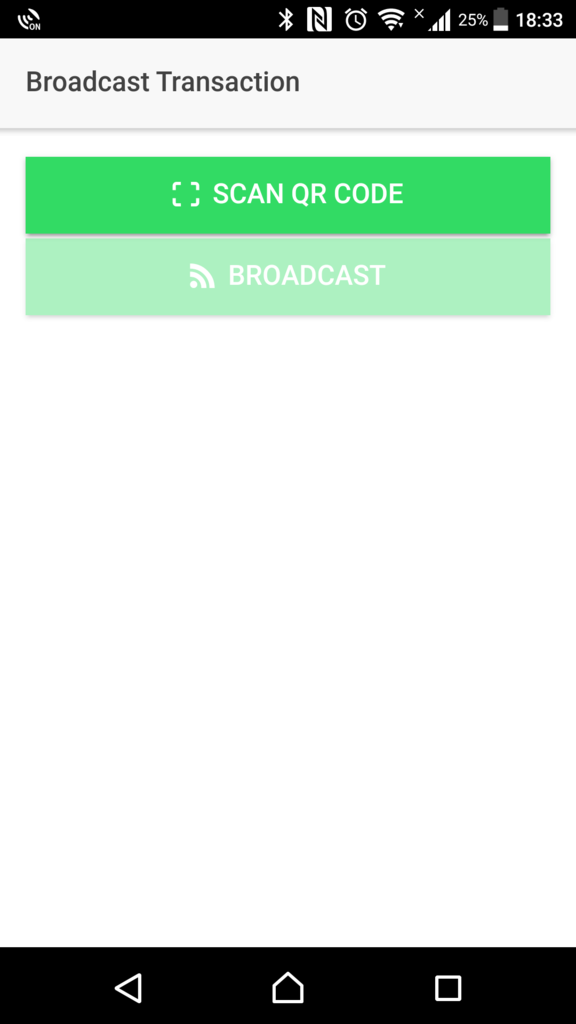
##### Description
#### SCAN QR CODE
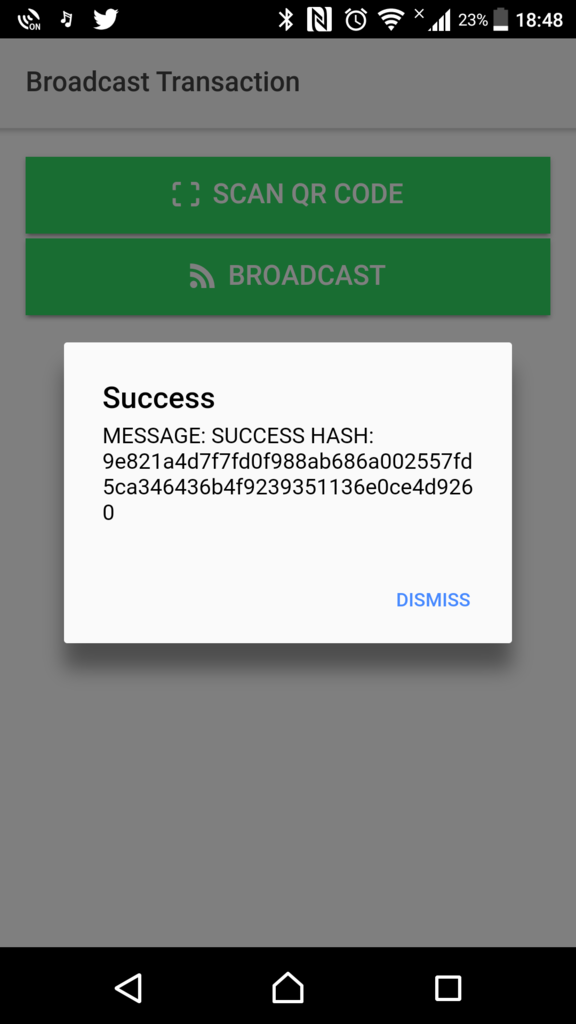
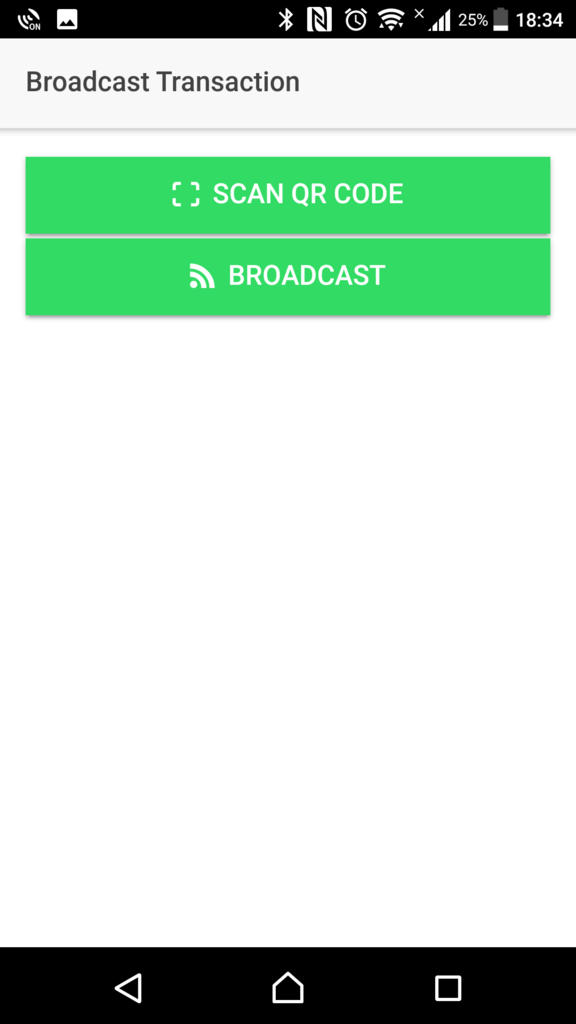
Press the `SCAN QR CODE` button and scan the generated QR code on the 'NEM Hot/Cold' wallet app on your other phone.
Upon a successful scan, the 'BROADCAST' button is enabled, and the transaction can be broadcast on to the NEM network.
A successful broadcast will give a similar message as shown below. Complete with a transaction hash and a 'Success' or a 'Failure' message.

In case of insufficient funds etc., an error message will also be displayed.
And that's it. You have now received and sent from an offline wallet, the NEM Hot/Cold Wallet.
6 Likes
First of all, it looks great and it is great to see the progress you guys are making with all the blockchains on the rise i took my first programming lessons this week  woop woop
maybe a collaboration between coins that run on the same scripts, the way I see it in the near future almost everyone will have 2 or more devices so why not blow the competition away by creating a small simple hardware wallet with a screen and no internet capabilities you can only set accounts e.g. wallets with a cable connection, yet still have the QR generator in it. later on, nem could also market a credit card to the package which can read the code generated by your nemllet (the cold wallet ) it’s not expensive to make a simple android device which can run the code…